Homing flowchart of a transfer unit — Raise Z before returning X, checking one axis at a time (sample)
Last updated: 2026-09-23 / Category: Samples, flowcharts
The homing of a transfer unit made of a vertical Z (double-solenoid air cylinder), a horizontal X (servo) and a chuck. Drawn for anyone who sent "all axes to home" at once and hit something on the way back: Z is raised fully before X returns.
Open this sample in the editor Download the JSON
The free browser editor opens in a new tab with this flowchart loaded. No installation, no sign-up, and nothing you enter is sent anywhere. Editing it does not change the sample on this page. The JSON is the source data for reopening it in the editor or handing it to an AI (format: JSON data format).
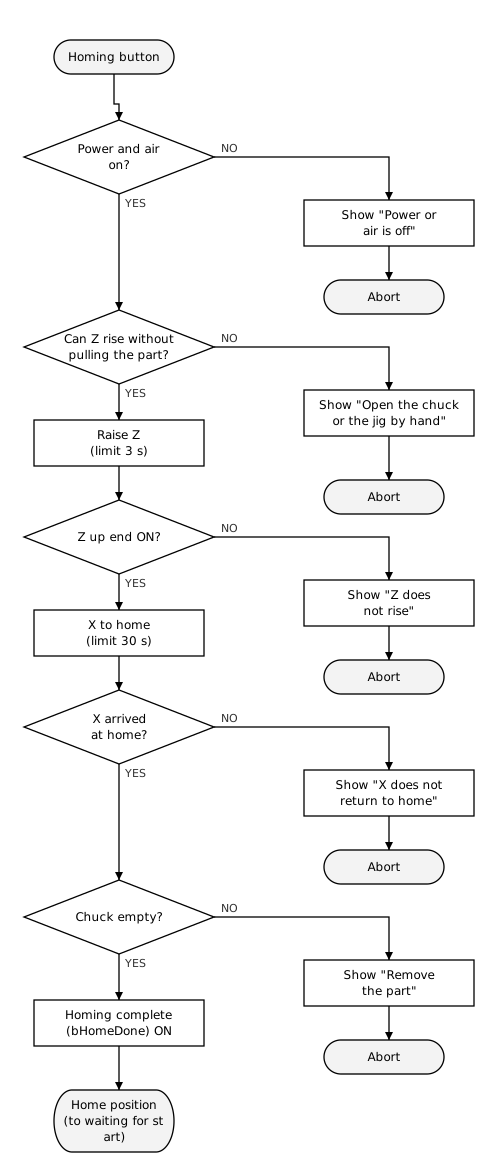
1. Each stage: check power and air before moving, and give each axis a limit
- "Homing button": accepted only while automatic operation is stopped. After an emergency stop it is pressed after the reset (Emergency stop recovery flowchart (sample)).
- "Power and air on?": check the supply pressure as well as the power, because Z runs on air. If the emergency stop exhausts the air, pressure returns gradually; moving before it has recovered turns the cause into "Z will not rise".
- "Can Z rise without pulling the part?": NO when the chuck is gripping the part and the jig clamp is also closed. Raising Z would tear the part or pull the jig with it. This is the state after a stop in the middle of a handover.
- "Raise Z": raise SOL ON, lower SOL OFF. "Z up end ON?" also checks that the down end has turned OFF, which catches sensor failures (Air cylinder timing chart (sample)).
- "X to home": if the home reference survives, it is simply a positioning move to the home position, as with an absolute servo. If the reference is lost, use the homing function of the amplifier or positioning unit to search for it — an incremental servo whose control power was cut, for example.
- "Limit 3 s", "limit 30 s": example values, set from the normal times measured during commissioning plus a margin. If an axis has not arrived when the limit passes, show a fault and command X to stop. Z is a double solenoid, so it stays on the raise side even with the SOL off (if it does not rise fully, check the air pressure and the sensors).
- "Chuck empty?": judged from the chuck's open-end and closed-end auto switches. Closed end ON means closed and empty; both OFF means a part is gripped. Automatic operation begins by opening the chuck before going to grip, so the chuck state is not part of the home position condition.
- "Homing complete (bHomeDone)": homing has been done and the position has not been lost. It stays ON when automatic operation starts moving, and turns OFF on an abort, a servo alarm or loss of control power. Whether the unit is at the home position right now is a separate signal (
bAtOrigin); start is accepted only when both are ON.
Signals in this chart — complete (bHomeDone) and at home (bAtOrigin) are separate signals
| Name | Direction | Meaning |
|---|---|---|
bHomeBtn | Input | Homing button |
bPowerOn | Input | Power is on (safety relay auxiliary contact) |
bAirOK | Input | Supply pressure is on (pressure switch) |
bChuckOpenEnd / bChuckCloseEnd | Input | Chuck open end / closed end |
bJigClampEnd | Input | Jig clamp closed end |
bZUpSol / bZDownSol | Output | Z raise / lower SOL |
bZUpEnd / bZDownEnd | Input | Z up end / down end |
bXHomeReq | Output | Command to return X to home (search for home, or position to the home position) |
bXAtHome | Input | X's current position is within the home tolerance and positioning is complete. Different from the amplifier's or positioning unit's "homing complete", which marks that the reference is established and usually stays ON after leaving home |
bHomeDone | Internal | Homing done and position not lost (stays ON during automatic operation) |
bAtOrigin | Internal | At the home position now (bZUpEnd and bXAtHome both ON; computed every scan) |
2. Why this order: to avoid collisions, raise Z fully, then one axis at a time
Homing is the procedure that returns the machine to the home position (where automatic operation starts) without a collision, wherever it stopped. It is the "return to home position" of How to draw a PLC control flowchart. Send "all axes to home" at once and, depending on where it stopped, something collides on the way. So the order is decided first.
- Raise Z fully before moving X With Z down, the chuck or the gripped part hits the jig or the conveyor. The machine is built so that, with Z at its up end, X can go anywhere without hitting anything, even holding a part. That up end is the condition for moving X, in automatic and manual operation as well as in homing.
- One axis at a time, confirming arrival before the next Moving both at once, X collides if Z stops partway. Moving Z and X together is faster, but homing is rare, so certainty wins over speed. A homing speed lower than automatic operation also limits the damage if something does collide.
- The chuck is not opened during homing Opening it drops the gripped part. If a part is left, show a message and stop; homing is repeated once it has been removed. How it is removed (open the door and take it by hand, or open the chuck in manual mode) is decided per machine.
- Faults say which axis stopped A plain "homing fault" means investigating all over again on site. Split by axis, the place to look is obvious: air pressure and sensors for Z, the amplifier alarm for X.
3. The specification states the order, the conditions to move on, the limits, and what is not moved
- The return order and the condition for moving to the next axis (which sensor or signal means "arrived"; items 1 and 2 of section 2)
- The time limit per axis and the fault display (section 1, item 4 of section 2)
- The condition for moving X (Z up end), applied in automatic and manual operation too (item 1 of section 2)
- Which side is opened by hand after a stop in the middle of a handover (section 1)
- What homing does not move (the chuck and so on) and what happens when a part is left (item 3 of section 2)
- The conditions that clear homing complete, and the condition for being at the home position (section 1)
More axes are drawn the same way: decide the collision-free order first, then line up "move → arrived?" in that order.
Once open in the editor, double-click a symbol to change its text.
The tools this sample was made with
- Flowchart Editor — The figure above and the sample JSON were made and exported with this editor.
- Timing Chart Editor — The order of the homing command and completion signals for X can be drawn as a timing chart.
Related articles
- How to draw a PLC control flowchart
- Emergency stop recovery flowchart (sample)
- Air cylinder timing chart (sample)
- Servo positioning timing chart (sample)
yk.builds